Page 3 of 9 FirstFirst 12345 ... LastLast
Results 21 to 30 of 85

Thread: CARF SPITFIRE ASSEMBLY and SCALE DETAILING

  1. #21
    Senior Member rpm's Avatar
    Join Date
    Jan 2015
    I am
    Paul M
    Last Online
    01-25-2026
    Location
    Woodbridge, ON
    Preferred Radio
    Futaba 18MZ, Jeti DS-16

    Posts
    511

    Mentioned
    0 Post(s)
    Tagged
    0 Thread(s)

    Thumbs Up
    Received: 56
    Given: 58
    Feedback Score
    0

    0 Not allowed!

    Re: CARF SPITFIRE ASSEMBLY and SCALE DETAILING

    I hope you have a great trip Brian. Looking forward to see you at RC400 Club when you get back.
    Humber Valley RC Flyers

  2. #22
    Senior Member Machzx's Avatar
    Join Date
    Jan 2015
    I am
    Ed
    Last Online
    04-18-2020
    Location
    Sutton
    Preferred Radio
    Futaba 18mz

    Posts
    4,055

    Mentioned
    0 Post(s)
    Tagged
    0 Thread(s)

    Thumbs Up
    Received: 528
    Given: 511
    Feedback Score
    0

    0 Not allowed!

    Re: CARF SPITFIRE ASSEMBLY and SCALE DETAILING

    Enjoy the trip!!
    only to ways I like to drink !!
    By myself or with somebody!!
    miss you son always

  3. #23
    Senior Member BAMDFISHER's Avatar
    Join Date
    Jan 2015
    I am
    Brian Fisher
    Last Online
    08-15-2016
    Location
    North of Parry Sound on Georgian Bay
    Preferred Radio
    Spektrum DX18 Voice Options

    Posts
    303

    Mentioned
    0 Post(s)
    Tagged
    0 Thread(s)

    Thumbs Up
    Received: 13
    Given: 3
    Feedback Score
    0

    0 Not allowed!

    Re: CARF SPITFIRE ASSEMBLY and SCALE DETAILING

    ELEVATOR CONTROL SYSTEM

    Well I'm back from 11 great days at Joe Nall. There were four other Spitfires (3 from Germany) that I got to watch fly and take lots of pictures on how each one did some unique things to their planes.

    The control of the elevator is done with a long carbon fiber shaft that has two ball links attached to it.
    I personally like to use the SDS carbon fiber tray to hold the servo and use the auxiliary ball bearing pivot to reduce the stresses on the servo gear train.

    These are available at SDS Hobbies SKU SACF20111 for $17.29.

    I am using Savox Brushless 2270 servos on all of the flying servos. I have had great success on all of my other planes using them and they don't draw a lot of power during the flight. The torque for this servo is 444 oz. inches at 0.12 seconds.

    I did learn that the elevator on this Spitfire design is very sensitive and you need a lot of Expo around 65%. On landing about 1mm of down is required when the flaps (really an airbrake) are deployed. Two of the German flyers (who are part of a massive 9 plane war bird flying event at the noontime show) both use some Butterfly in their aerilons during landing. There is no mention of this in the Carf Manual.

    Here are the weights of the items added to the Spitfire.

    Control Rod with 2 Ball Links 52 grams
    Elevator CF tray with Control Horn 32 grams
    Servo with Arm and 2 Ball links 80 grams

    http://www.sdshobby.com/catalogsearc...SACF2011&cat=0
    Attached Thumbnails Attached Thumbnails Click image for larger version. 

Name:	B CARBON FIBER CONTROL ROD.jpg 
Views:	175 
Size:	397.9 KB 
ID:	9974   Click image for larger version. 

Name:	C FROM THE TAIL FORWARD.jpg 
Views:	238 
Size:	188.0 KB 
ID:	9975   Click image for larger version. 

Name:	D SDS CARBON FIBER SERVO HOLDER.jpg 
Views:	184 
Size:	525.7 KB 
ID:	9976   Click image for larger version. 

Name:	E ELEVATOR CONTROL SETUP.jpg 
Views:	277 
Size:	313.3 KB 
ID:	9977   Click image for larger version. 

Name:	A ELEVATOR CNNECTION.jpg 
Views:	236 
Size:	382.2 KB 
ID:	9973  

    Last edited by BAMDFISHER; 05-15-2016 at 07:15 AM.

  4. #24
    Senior Member JoeT's Avatar
    Join Date
    Jan 2015
    I am
    Joe T
    Last Online
    05-21-2026
    Preferred Radio
    Futaba, FrSKY

    Posts
    879

    Mentioned
    0 Post(s)
    Tagged
    0 Thread(s)

    Thumbs Up
    Received: 78
    Given: 74
    Feedback Score
    0

    0 Not allowed!

    Re: CARF SPITFIRE ASSEMBLY and SCALE DETAILING

    Hey Brian,

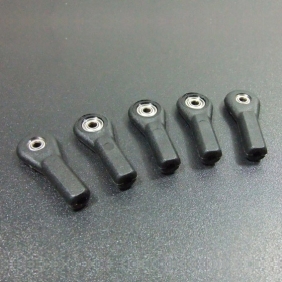
    Have you seen these? For single pushrod elevator control, ball bearing 3mm rod ends would probably be a less friction more durable setup.

    http://boomarc.com/en/2-x-high-quali...straight-links


    http://sdshobbyusa.net/index.php?mai...oducts_id=3766
    Last edited by JoeT; 05-15-2016 at 08:32 AM.

  5. #25
    Senior Member BAMDFISHER's Avatar
    Join Date
    Jan 2015
    I am
    Brian Fisher
    Last Online
    08-15-2016
    Location
    North of Parry Sound on Georgian Bay
    Preferred Radio
    Spektrum DX18 Voice Options

    Posts
    303

    Mentioned
    0 Post(s)
    Tagged
    0 Thread(s)

    Thumbs Up
    Received: 13
    Given: 3
    Feedback Score
    0

    0 Not allowed!

    Re: CARF SPITFIRE ASSEMBLY and SCALE DETAILING

    FUEL TANK

    The Monforton book on page 2.31 lists the location and size of the fuel intake in the fuselage along with the two breather holes. I tried to simulate the size and shape with the existing fuel dots that are available. As this is a Sports Scale version, I'm not worried that the fuel dot is a 1/32 inch too big.

    Thunderbolt RC sells a new Seacraft fuel bottle holder that worked very well for my situation. I was able to shape it to the fuselage shape and I held it in place with Hysol 9462 Epoxy. It will never move!

    The mounts only weigh 32 grams. http://www.thunderboltrc.com/index.p...oducts_id=2155

    I was able to put the fuel tank exactly over the CG for this airplane, so I should have no trouble with the trim as the fuel is used up. I'm using a 50cc tank for the 77cc 4 Stroke engine, but if I need more it is easy to add a Pepsi 710cc tank.

    I personally like using the quick disconnects from Thunderbolt, it makes it very easy to remove the tank in seconds. The one on the line to the engine even has a quick shut off so if there is any tank it won't leak out. http://www.thunderboltrc.com/index.p...oducts_id=1300

    Total weight for the mounts, tank and fittings was 176 grams.
    Attached Thumbnails Attached Thumbnails Click image for larger version. 

Name:	A FUEL INLET.JPG 
Views:	215 
Size:	38.9 KB 
ID:	9981   Click image for larger version. 

Name:	B TOP FUEL PICTURE.JPG 
Views:	181 
Size:	22.2 KB 
ID:	9982   Click image for larger version. 

Name:	C FUEL INLET DRAWING.JPG 
Views:	207 
Size:	22.5 KB 
ID:	9983   Click image for larger version. 

Name:	D FUEL DOT DIMENSIONS.JPG 
Views:	173 
Size:	47.0 KB 
ID:	9984   Click image for larger version. 

Name:	E FUEL TANK.jpg 
Views:	214 
Size:	285.2 KB 
ID:	9985  

    Click image for larger version. 

Name:	F QUICK DISCONNECTS.jpg 
Views:	188 
Size:	268.1 KB 
ID:	9986   Click image for larger version. 

Name:	G FUEL DOT & BREATHERS.jpg 
Views:	221 
Size:	206.3 KB 
ID:	9987  
    Last edited by BAMDFISHER; 05-15-2016 at 02:22 PM. Reason: Forgot to add weight.

  6. #26
    Senior Member BAMDFISHER's Avatar
    Join Date
    Jan 2015
    I am
    Brian Fisher
    Last Online
    08-15-2016
    Location
    North of Parry Sound on Georgian Bay
    Preferred Radio
    Spektrum DX18 Voice Options

    Posts
    303

    Mentioned
    0 Post(s)
    Tagged
    0 Thread(s)

    Thumbs Up
    Received: 13
    Given: 3
    Feedback Score
    0

    0 Not allowed!

    Re: CARF SPITFIRE ASSEMBLY and SCALE DETAILING

    TAIL WHEEL BRACKET

    I have had too many visits to three hospitals and I don't know how many doctors to let me work on this project. But finally I have been able to get back to it.

    I decided to go with a Steerable Tail wheel and opted for one made by Shindin Machine http://www.shindinmachine.com/SPITFIRE/SPITFIRE.html.

    This tail wheel uses the same steering technique as a trike nose wheel.

    My first step was to install two aluminum bushing mounts to control the 5/32" steering rod. These were put in place with more Hysol EA 9462 Locktite glue.

    Next, I made the vertical support plate out of 3/16' birch plywood. As you can see there are a lot of holes in it for the two pushrods and for the steering arm. Making this part takes a lot of time getting the correct profile shape. I first made a card stock template, followed by a balsa template and then a thin plywood template. Once that I was happy that I had the correct profile shape with the holes in the proper position and large enough, I made the final 3/16" birch former. I sanded the sides at a 6 degree taper so that it would fit snugly against the fuselage.

    Total weight for just the former and its supporting hardware is 39 grams. This does not count the tail wheel and the control rod!

    Next is to build the tail wheel servo box.
    Attached Thumbnails Attached Thumbnails Click image for larger version. 

Name:	STEERABLE TAIL WHEEL.jpg 
Views:	237 
Size:	343.7 KB 
ID:	10206   Click image for larger version. 

Name:	CONTROL HORN WHEEL COLLAR IN PLACE.jpg 
Views:	207 
Size:	243.5 KB 
ID:	10211   Click image for larger version. 

Name:	PLYWOOD BRACKET.jpg 
Views:	231 
Size:	219.4 KB 
ID:	10210   Click image for larger version. 

Name:	WIRE ROD SUPPORTS.jpg 
Views:	246 
Size:	207.8 KB 
ID:	10209   Click image for larger version. 

Name:	CONROL ROD PARTS.jpg 
Views:	217 
Size:	382.0 KB 
ID:	10208  

    Click image for larger version. 

Name:	.1875 BIRCH FORMER.jpg 
Views:	209 
Size:	295.3 KB 
ID:	10207  

  7. #27
    Senior Member BAMDFISHER's Avatar
    Join Date
    Jan 2015
    I am
    Brian Fisher
    Last Online
    08-15-2016
    Location
    North of Parry Sound on Georgian Bay
    Preferred Radio
    Spektrum DX18 Voice Options

    Posts
    303

    Mentioned
    0 Post(s)
    Tagged
    0 Thread(s)

    Thumbs Up
    Received: 13
    Given: 3
    Feedback Score
    0

    0 Not allowed!

    Re: CARF SPITFIRE ASSEMBLY and SCALE DETAILING

    TAIL WHEEL CONTROL SYSTEM

    I opted to put in a Hitec 5087 metal gear micro servo to control the tail wheel. I will program (using a separate channel), this servo to my rudder and will then be able to have it work in the right amount for deflection when I use the rudder for steering.

    http://hitecrcd.com/products/servos/...servo-/product.

    The servo tray is made from items supplied by Carf for this kit. I plan to assemble the aerilons using a different holding technique, so this wooden tray was available. Again I used Hysol Locktite glue to hold it to the side of the fuselage. If I need a larger servo, the tray is easy to open up the space to slide in a bigger style of servo.

    Weight for the tray was 18 grams and the servo was 22 grams.

    Next to carefully attach the hatch back to the fuselage and the tail wheel project will be DONE!
    Attached Thumbnails Attached Thumbnails Click image for larger version. 

Name:	TRAY BRACKET.jpg 
Views:	151 
Size:	328.4 KB 
ID:	10214   Click image for larger version. 

Name:	HITEC SERVO.jpg 
Views:	184 
Size:	283.3 KB 
ID:	10215   Click image for larger version. 

Name:	ASSEMBLY.jpg 
Views:	383 
Size:	235.3 KB 
ID:	10216  

  8. #28
    Senior Member BAMDFISHER's Avatar
    Join Date
    Jan 2015
    I am
    Brian Fisher
    Last Online
    08-15-2016
    Location
    North of Parry Sound on Georgian Bay
    Preferred Radio
    Spektrum DX18 Voice Options

    Posts
    303

    Mentioned
    0 Post(s)
    Tagged
    0 Thread(s)

    Thumbs Up
    Received: 13
    Given: 3
    Feedback Score
    0

    0 Not allowed!

    Re: CARF SPITFIRE ASSEMBLY and SCALE DETAILING

    TAIL WHEEL HATCH

    I used Button Head Screws #2 x 3/16 inch from Micro Fasteners to hold the hatch in place. Once painted the screws will look somewhat scale for this airplane.
    Attached Thumbnails Attached Thumbnails Click image for larger version. 

Name:	TAIL WHEEL HATCH.jpg 
Views:	286 
Size:	222.7 KB 
ID:	10217   Click image for larger version. 

Name:	HATCH.jpg 
Views:	220 
Size:	196.4 KB 
ID:	10218   Click image for larger version. 

Name:	BUTTON HEAD SCREWS.jpg 
Views:	172 
Size:	233.9 KB 
ID:	10219  

  9. #29
    Senior Member -Rick-'s Avatar
    Join Date
    Jan 2015
    I am
    Rick
    Last Online
    01-19-2025
    Location
    Chesley Ontario
    Preferred Radio
    Horus

    Posts
    782

    Mentioned
    1 Post(s)
    Tagged
    0 Thread(s)

    Thumbs Up
    Received: 50
    Given: 68
    Feedback Score
    1 (100%)

    0 Not allowed!

    Re: CARF SPITFIRE ASSEMBLY and SCALE DETAILING

    Nice work Brian! She will be a looker when you finish it!!

    Hope you get the health issues worked out soon.

  10. #30
    Senior Member -Rick-'s Avatar
    Join Date
    Jan 2015
    I am
    Rick
    Last Online
    01-19-2025
    Location
    Chesley Ontario
    Preferred Radio
    Horus

    Posts
    782

    Mentioned
    1 Post(s)
    Tagged
    0 Thread(s)

    Thumbs Up
    Received: 50
    Given: 68
    Feedback Score
    1 (100%)

    0 Not allowed!

    Re: CARF SPITFIRE ASSEMBLY and SCALE DETAILING

    Double post
    Last edited by -Rick-; 06-02-2016 at 11:59 PM. Reason: Double post

Thread Information

Users Browsing this Thread

There are currently 1 users browsing this thread. (0 members and 1 guests)

Posting Permissions

  • You may not post new threads
  • You may not post replies
  • You may not post attachments
  • You may not edit your posts
  •